Formally known as 'Let's Get Shabby' since 2009.
Times have changed and many of us have found our styles have too.

Friday, April 30, 2010

Mini-Tutorial HOW TO MAKE YO-YOs


It's sooo easy to fall in love with Yo-yo flowers!!

They are very easy to make and I just zip them together without much fuss or measuring.

LOL - I've been adding them to EVERYTHING at the moment! Firstly I bought a few - but then wanted them in specific colours or sizes - and thats hard when I'd want them on the spur of moment in a frenzy of creativity (soooo sure you know what I mean!!!) I had plenty of bits of fabric and soon enough - I had little plastic packets full of them stashed away for my whims!!


Here's a compact little tute for you to follow:


STEP ONE Cut out a cardboard circle twice as big as you would like your yo yo’s to be.
Place on fabric, draw around the outside of the cardboard circle and cut out.


STEP TWO
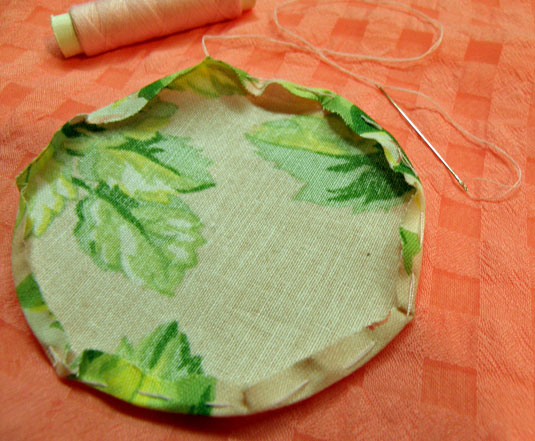
Press over the edge of the fabric with an iron about ¼ inch in, then tack around with needle and thread keeping fairly close to the ironed crease.


STEP THREE
Pull the thread tightly and start gathering the outer edges in


STEP FOUR
Pull thread very tight until the yo yo has formed.


STEP FIVE
You can tie off thread and leave plain OR you can add a button!


And finally....
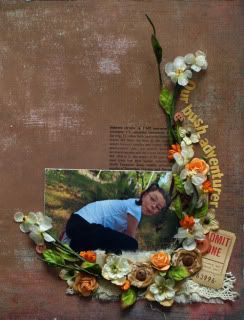
See how differently this looks with a green background!!


Hope you have fun with this one!!!

And its great to use up all those bits and pieces of fabric stashed away!


------------------------------------------------


If you would love to purchase a specially put together one-off kit from


SISSEY KITS

especially for Let's Get Shabby
click here to have a look!!!

-------------------------------------------------------

AND just as a quick link....

We are waiting with bated breath to see how you interpret


Sunday, April 25, 2010

CHALLENGE #11


IT'S ALL ABOUT COLOUR!!

Here in Australia at the moment its Autumn!
And maybe where you live its Spring!!
Either way, look at this incredible Quilt.
Be inspired however you like....it would be nice to see you include some fabric somewhere
but remember...
its a


COLOUR CHALLENGE


GUEST DTer


Here's the prize!!
Twiddleybitz pack including 1 x Funky Townhouse, 1 x Funky Attic House, 1 x Nero Wrought Iron Border, 1 x Hanging Chandelier, 1x Chandelier for Cards
sponsored by
thanks soooooo much!!!
Psssst: There will also be a special kit available from Sissey made up just for 'Let's Get Shabby'
Check back here for more details soon!!
Remember to check the FAQS and Rules on the lefthand side
And upload your Challenge #11 creations by midnight (Australian time) 20th May!

The Shabby Girls will get their creations and details up on their blogs soon!!

We absolutely cant wait to see for your submissions!!!

xx


Friday, April 23, 2010

CHALLENGE #11 SPONSOR AND GUEST DTer

Now Challenge #10's Winner and HM's have been announced...

It's time to reveal our next Sponsor

We are delighted to have ....


who explains:

Each month at Sissey we bring you new exciting co-ordinating kits.
We have our 'Must Have It All' - the smaller monthly kit
and the
'Limited Edition Kit'
Here at Sissey, we specialise in monthly scrapbook kits
brimming with endless possibilities, tips, and examples.
You will love receiving your monthly kit, loaded with some of the latest products complementing each other and then creating amazing layouts and off the page projects that everyone will love! Our kits are created with you in mind.
Instead of you having to purchase a product that is pre-packaged to include more than you need, we will often split the packaging to give you just what you need.
You can either choose to purchase a one off kit, or subscribe to one of our monthly kit packages. The aim of our kits is to help bring out your creativity, giving you the chance to experiment with products you may not normally choose to work with.
Sneak Peaks and kit contents are available from the 1st of each month.

Sissey = Scrapbook in Style Simply Enjoy Yourself
.
.
........................................
.
.
And Guesting Challenge#11 for Sissey
is
I am a very proud Air Force wife with four gorgeous (sometimes willing) photographic subjects aka my children who range in age from 4 years to 23 years! I have been doing some kind of craft since I could hold a pair of scissors and have been seriously scrapping for 10 or so years. I scrap for family, friends and to keep my sanity LOL! I am also lucky enough to work as Technical Editor for Scrapbooking Memories Magazine. I hope to give you lots of inspiration with the beautiful kits from Sissey and I look forward to seeing what YOU create!
.
.
So there you are....
.
a tantalising piece of wonderful information for Challenge#11's reveal on the 25th!!!
.
See you then!!!
.
Its a date!!
.
xx
...
.
.

Thursday, April 22, 2010

CHALLENGE #10 WINNER & HONORABLE MENTIONS!!


What absolutely AMAZING creations
for

A Shabby Easter!

Each and every submission was incredible!!
Its truly remarkable that submitting here brings so many visitors to each of your blogs and we all learn so much when visiting too!!

Welcome if you have only begun playing with us....

AND thank you so much to our loyal shabby girls who return every month submitting such stunning work!!! You know who you are.....we know who you are!!!!!

And who has won these fabulous prizes???

from
What Is Old Is New KitsVintage Kit
AND
April's Vintage Kit
Thanks soooooo much Mel for sponsoring us again!!!
and without further ado.......


THE


WINNER


IS


Congrats!!!
What a wonderful wonderful Matchbox!!
Please email your details Jan!!


OUR HONORABLE MENTIONS


ARE............


Maria


Unni


Natasja


Leslie

Thanks again to all our wonderful submissions!!!
Truly truly awesome!!
We'll be back in a day or so to announce our next SPONSOR!!!!
And we cant WAIT to reveal Challenge 11
Its FABULOUS!!!!
XX

Sunday, April 18, 2010

CALLING FOR....

all those fabulous last minute
creations!!!
CHALLENGE #10
closes midnight on
Tuesday
20th April
Waiting in anticipation.........................
(very big smile)


Saturday, April 10, 2010

IT'S TIME FOR.....

Another Shabby Technique!

We must apologise for the lateness of this one. We had planned on putting it up last week before the Easter break but issues with emails bouncing back to Ruth and didn't get them in time so keep this stunning Easter idea from Ruth in mind for next year.

To make these eggs you will need.

-Paper Mache or foam eggs.
-White gesso, pastel paints, Mod podge and glue
-Selections of ribbons, flowers and tags etc
-Distress crackle paint and fine glitter

To make the eggs

1. Apply a layer of white Gesso to the eggs to act as a base, especially if using the foam eggs

2. Apply 2 coats of pastel coloured acrylic paints

3. Add complimentary colour of Distress Paint onto the top half only or some glue and glitter then leave to dry.

4. Glue ribbon or pearl trim around the sides of the egg. You may choose to glue some ribbon across the center of the egg before gluing the sides.

5. Arrange a small bouquet of contrasting or complimentary flowers and glue onto the center of the egg. I also used some Vintage paper images underneath the paper flowers.

6. Finish with a ribbon bow and a small tag adorned with words or images.

Bit late but just HAD to share these beautiful eggs and we hope that they have inspired you to make up some of your own for next years Easter holidays.