
It's sooo easy to fall in love with Yo-yo flowers!!
They are very easy to make and I just zip them together without much fuss or measuring.
LOL - I've been adding them to EVERYTHING at the moment! Firstly I bought a few - but then wanted them in specific colours or sizes - and thats hard when I'd want them on the spur of moment in a frenzy of creativity (soooo sure you know what I mean!!!) I had plenty of bits of fabric and soon enough - I had little plastic packets full of them stashed away for my whims!!

Here's a compact little tute for you to follow:
STEP ONE Cut out a cardboard circle twice as big as you would like your yo yo’s to be.
Place on fabric, draw around the outside of the cardboard circle and cut out.
 Cut out a cardboard circle twice as big as you would like your yo yo’s to be.
Place on fabric, draw around the outside of the cardboard circle and cut out.
STEP TWO
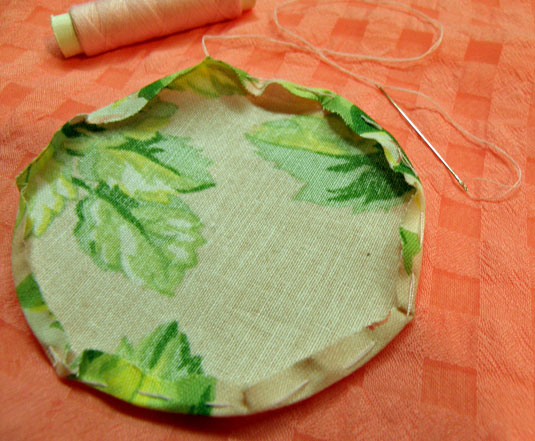 Press over the edge of the fabric with an iron about ¼ inch in, then tack around with needle and thread keeping fairly close to the ironed crease.
STEP THREE
 Pull the thread tightly and start gathering the outer edges in
STEP FOUR
 Pull thread very tight until the yo yo has formed.
STEP FIVE
 You can tie off thread and leave plain OR you can add a button!
And finally....
 See how differently this looks with a green background!!
Hope you have fun with this one!!!
And its great to use up all those bits and pieces of fabric stashed away!
------------------------------------------------
If you would love to purchase a specially put together one-off kit from
SISSEY KITS
 especially for Let's Get Shabby
 click here to have a look!!!
-------------------------------------------------------
AND just as a quick link....
AND just as a quick link....
We are waiting with bated breath to see how you interpret
10 comments:
First, love the blog header! And wow on those yo-yo-flowers! I may have to try to sew one...but keep paramedics on stand-by when I use a needle! hee hee
That you for that wonderful tutorial!!!! Love these and want to start making them right away!!!
Oh darn, I wish I could sew :( Beautiful buttons!
Wow Missy Mandy these look great and so easy. Thanks for sharing.
I love these flowers!!
Gorgous and it looks so easy to make, I will try to make them!!
Thanks Mandy!!
xxxx
Chimene
Mandy your Yo yo flowers have even inspired my 70 year old mum to e-mail me and aask why are they called yo yo flowers she plans on making some to put on a bag like mine!!
LOVE your flowers, Mandy!!
Thanks for this tutorial, think I'm going to try and make some of them!!
XXXJenneke
Thanks girls......
aaaaaaaaah Ruth! I have an answer (I LOVE history!)
Originally called Suffolk Puffs. (I’m guessing this is why your mum wanted to know why they are called yo-yos) The name “Suffolk Puff” indicates the origin of the object; Suffolk England. They look quite like the ‘hats’ that peasants or labourers would wear in the area for which was mostly agriculture. They were used mainly joined together as patchwork from old worn out clothes and fabric scrapes…a way to not waste anything. All pieces were sewn together to make quilts and Suffolk Puffs became its signature patchwork for a period of time.
Fabulous! so easy and no need for a sewing machine!! thank you tons for sharing Mandy!
Post a Comment